


![How to Launch an Online Store as Quickly as Possible [Before the Holidays]](https://files.cdn.printful.com/o/upload/blog-post-img-upload/57/575c3ec9e1648c84e69158c3a5ba2533_l)
Table of contents
If you’ve always wanted to launch an online store, but have been waiting for the right time to do it, the wait is over. With several big shopping occasions happening this fall and winter, your chance to launch an online store has finally come!
Wait a little longer, and you risk launching a website that’s not ready to welcome the holiday shoppers during the most profitable time of the year.
Ideally, your store should be up and running by October. But the sooner you start working on it the better as you have little time to figure out how to attract traffic, create marketing campaigns, and plan your biggest sales for Black Friday and Cyber Monday.
How to set up an online store fast
We’ve gone through the process of launching online stores countless times—we’ve got it down to an art. Here is the absolute fastest way to launch your online store, step by step.
1. Pick your ecommerce platform
Picking your ecommerce platform is one of the most important decisions you’ll have to make when launching your online store. There’s a plethora of options out there, but if you’re looking for a hassle-free way to get your store up and running, Shopify is your best bet.

Here’s a good old pros and cons list to show you why this ecommerce platform should be your choice:
Shopify pros:
- Easy and fast setup. Shopify is user-friendly and has all the necessary tools (a logo maker, a profit margin calculator, an invoice generator, you name it) to help you launch a functioning online storefront stress-free.
- Hosting services included. By creating your store on Shopify, you’ll have hosting services set up automatically, which otherwise would take extra time to research and configure.
- Ready-to-use store themes. Shopify has a range of mobile-friendly website templates that you can use and tweak to your liking.
- Reliable customer support. Shopify is known for its unbeatable customer service that is available 24/7. If you run into a hiccup while setting up your store, you can be sure that you’ll have personal assistance available whenever you need it.
- Tools to scale your business. Shopify has an App Store where you can download free and paid ecommerce apps to grow your business.
Shopify cons:
- Price. With a $29 monthly fee, Shopify is pricier than its competitors. But the great news is that you can use their 14-day free trial (that can be extended) to test the waters and decide whether this platform meets your needs.
If Shopify isn’t for you, other user-friendly platforms include BigCommerce, Weebly, Pixpa, and Ecwid. The rest of this blog will concentrate on setting up with Shopify, but the steps are similar for other platforms.

2. Get a custom domain name
For a more professional look, purchase a custom domain name for your store. The fastest way to set it up is to register and buy it directly from Shopify.
In the Sales Channels section of your Shopify dashboard, go to Online Store then Domains. Click the Buy new domain button to search available names.

A purchased domain is registered for one year and can be renewed automatically. Note that Shopify doesn’t provide email accounts as part of its domain services, but supports unlimited email forwarding accounts for your domain name.
3. Set up an online payment processor
Accepting payments is an integral part of any business, yet often overlooked by budding entrepreneurs. Here are two trustworthy payment processors with fast and easy setup:
Shopify Payments
Shopify has a built-in payment gateway called Shopify Payments. It’s automatically set up as soon as you create your store.
Shopify Payments is available in 13 countries and regions including:
- Australia
- Canada
- Denmark
- Germany
- Hong Kong SAR China
- Ireland
- Japan
- The Netherlands
- New Zealand
- Singapore
- Spain
- United Kingdom
- United States
How to configure Shopify Payments:
- In your dashboard, click Settings followed by Payment providers
- Click Activate Shopify Payments in the Shopify Payments box
- Complete the setup by entering required details about you and your store
PayPal
If Shopify Payments isn’t available in your country, Shopify will automatically create a PayPal Express Checkout account for the email address you used to set up your store.
If you already have a PayPal account with that email address, you can receive payments from orders made with PayPal right away. But if you want to issue refunds or manually capture payments, you need to finish setting up your PayPal account.
PayPal is the biggest and most well-known online payment gateway in the world, owning over 60% of the market. They have two different plans for small businesses, Standard and Pro.
How to set up PayPal on Shopify:
- In your dashboard, click Settings followed by Payment providers
- Select Deactivate in the PayPal Express Checkout box
- Once you deactivate the Paypal Express Checkout, select your PayPal account type and click Activate
- Enter the email address of your Paypal account, then click Next and enter your PayPal account password to log in
- On the PayPal permissions page, click I Give Permission and once the confirmation page opens, click Go Back to Shopify
Don’t have a PayPal Business account with the email address you used to set up your Shopify store? Add your email address to an existing PayPal account or sign up for a new PayPal Business account with the same email address you used to create the store.
Neither Shopify Payments nor PayPal asks for your business registration number upon sign up. This means that you can set up a business account before you’ve registered a company. This will help you start your online store faster.
4. Install the Printful app
One of the best-selling product categories throughout the year and especially during the holiday season is clothing and accessories. If you fancy selling this category on your store, it’s easy to get started if you have the right tools at your fingertips.
Work smarter, not harder. Partner up with a print-on-demand (POD) dropshipper—a third-party service that prints apparel and accessories, and then ships them to your customers.
A few reasons why it’s worth considering this option:
- There’s no upfront cost—you pay for the product and printing only when an order comes in
- You don’t need to keep stock—it’s easy to introduce new products or experiment with different designs without spending a penny
- You don’t have to worry about shipping—your POD dropshipping partner will handle the packaging and shipping
Learn more:
- What Is Dropshipping
- Is Dropshipping Worth It
- Branded Dropshipping
- How to Start a Dropshipping Business
- Profitable Dropshipping Niches: How to Find Them + Top Picks
- 15 Dropshipping Tips You Need to Check Before Starting Your Business
Watch this video to get a better idea of how print-on-demand dropshipping works:
Intrigued? Try Printful’s Shopify app!
How to connect your Shopify store with Printful:
- In your Shopify dashboard, click Apps followed by Visit the Shopify App Store
- In the new window search for the Printful app
- Open Printful app listing and click Add app, then Install app
- Create a new Printful account or sign in to your existing account
- In the connection confirmation page, click Connect store to [your email address] to complete the installation
5. Pick your products
Printful has 160 products that you can print and embroider. For the fast launch, we recommend starting with print products because creating designs for them is easier. You can also add the same print file to other print products to expand your catalog.
Here are a few trendy products of the season you can add printed designs on:
- Sweatshirts
- Socks
- Mugs
- Wall art
- Leggings
- Phone cases
Learn More: Top 10 Trending Products to Sell Online
Pro tip
If you want to sell in Europe, choose products that are fulfilled in our European facility. That will reduce shipping time and costs for your customers across the Atlatic.
6. Create unique designs
Next, create designs that will go on your products.
Use Printful’s Design Maker to kick things off. It lets you create graphics and simultaneously generates print files that meet our guidelines.
A print file is the graphic we’ll print on your product.
Among the many things you can do with Printful’s Design Maker, here are a few must-tries:
- Add text or clipart. In the Design tab, you can play with text and clipart to create simple but stylish designs for your print products.

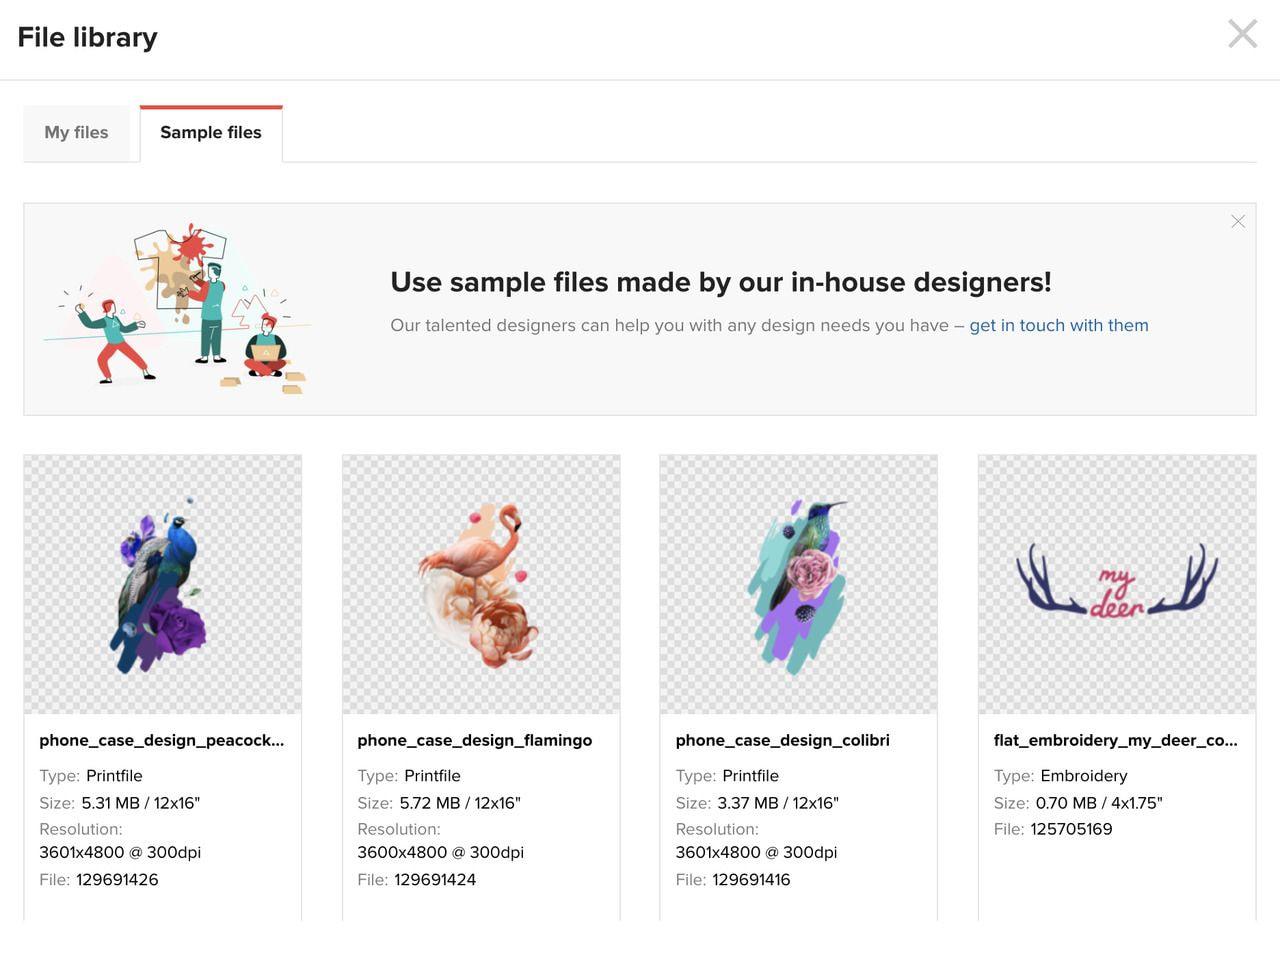
- Use free sample graphics. Click Upload files in the Design tab to browse the Sample file library. It’s full of colorful, free-to-use designs.
- Layer design elements. Because the Design Maker supports design layers, you can mix and match different elements to create one-of-a-kind graphics. You can also upload your design and spice it up with the text and clipart tools.
Stuck in a design rut? Take these 3 steps to come up with awesome t-shirt graphics.
Another shortcut is to work with Printful Graphic Design Services. Share your idea with our in-house design team and they will bring to life. You can also hire freelance designers, just make sure to inform them about Printful’s print file requirements.
7. Add products to your Shopify store
The final and most exciting step is to add your Printful products to your store.
Here’s how to do it step by step:
- Click Stores in your Printful Dashboard followed by Add in the Product sync section
- In the Product tab, select the product and its variations you want to sell, and in the Design tab, upload your print file or create one using our Design Maker. Click Proceed to mockups
- Select the mockup styles you like and click Proceed to descriptions
- You’ll see ready-to-go product titles and descriptions that will show up next to your product in your store. You can either edit them now to show your brand personality or leave as is. Click Proceed to pricing
- In the new window you’ll see three columns: Printful price (the price we charge you for the product and fulfillment), retail price (the price you charge on your store), and profit (how much you’ll make from a single sale). Set up your product prices and click Submit to store.
Voilà! You have added your first product to your store. Repeat the process to add more.
Welcome to the ecommerce world—you’re an entrepreneur now
There’s no better time to launch your new business than the holiday season. So do future you a favor and take the evening to launch your online store. You won’t regret it!
Once the essentials of your online store are set up, work on improving your storefront and marketing the products. Here are some articles that will help you along the way:
- How to Design a Professional Online Store
- How to Write An About Us Page That Rocks–Tips & Examples
- How to Market Expensive Products So They Look Like A Steal
And since you launched your store before fall and winter, give these holiday-related gems a read:
- 10 Steps to Jumpstarting Your Holiday Preparations [Free Checklist Inside]
- 10 Holiday Email Marketing Campaign Ideas You Must Try
- Marketing Trends for Boosting Holiday Social Media
Sometimes later becomes never. So if you want to start selling apparel online, do it today. Use this guide to jumpstart your ecommerce journey, and let us know if you have any questions!
This article was originally published in August 2017; it has since been updated.
