Get Started
Printful Blog logo
Creative services
Photography services

Blog / Ecommerce platform guide / How to Set Up an Online Store with Wix Stores and Printful

Ecommerce platform guide

Printful Blog

Master the art of ecommerce

Launch your own print-on-demand business

Sign up with Printful

No upfront fees • No order minimums • 328 premium products

Printful Blog

Blog / Ecommerce platform guide / How to Set Up an Online Store with Wix Stores and Printful

Ecommerce platform guide

How to Set Up an Online Store with Wix Stores and Printful

How to Set Up an Online Store with Wix Stores and Printful
Una Savčenko

By Una Savčenko

14 min read

Here we are—you, me, Wix, and Printful. 

You have ideas and artwork you want to share with the world. You’re interested in selling online and monetizing your designs with print-on-demand products. To do that, you want to get going with Printful and Wix Stores.

So that’s you, Wix, and Printful. What about me? I’m here to be your sensei. I want to guide you through the Wix Stores + Printful setup so you don’t have to stress about it.

I’ll show you how to add products to your storefront, set up payments, and figure out shipping. All the basics to get your business going with confidence.

If you’ve already started the setup process, use the index below and navigate directly to the sections you need help with.

1. Create your Printful and Wix accounts

To start, you need an account on both Printful and Wix. Let’s start with Printful. Creating your Printful account is free and you can do it on the Printful signup page. Another option is to click the red Let’s go button on Printful’s homepage.

  Table of Contents        Printful's sign up landing page

Here’s what Printful’s signup page looks like


When you log into your new Printful account, you’ll see a short onboarding checklist. The important thing is to add a payment method. That way, when a customer buys from you, we charge you for the order fulfillment straight away. And your customer doesn’t experience any delays with their order being processed.

Printful logo
Customer with received custom jacket
Printful logo
Create and sell custom products online
Lets go

Now let’s create a Wix account. You can register for free by entering the Wix signup page. Or click the white Get Started button on Wix’s homepage. During signup, you’ll be guided through an onboarding survey. Choose to create an online store and you’ll get a professional template with the Wix Stores app built-in. You need the app in order to sell your products and accept payments online.

You can add the Wix Stores app after onboarding as well. You’ll learn more about the app in the next chapter of this blog. 

store setup process

Here’s what Wix’s onboarding looks like after the survey

The last registration step on Wix’s end is choosing on which website editor to build your online store. You can get started with this process by clicking on the Design Site tab at the top right corner of your homepage.

  wix profile dashboard

The Design Site button is right above the setup

If you have limited web design experience and want your store created for you, choose Wix’s website builder. If you want to create a store on your own, choose a template. You’ll be able to pick from 900+ designer-made templates which you can edit from A to Z. 

wix website builder

Whether you choose the website-builder or to customize a template, you get full creative freedom when it comes to storefront design!

 As your sensei, I want to help you make the right decision, so I created a storefront using both options—letting Wix create a site for me and using a Wix template.

Wix’s website-builder created a website for me after I answered a couple of questions about my store and design wishes. It used the data I provided to auto-populate texts on my new storefront. It also let me choose what type of elements my website needs, like a chat feature and an Instagram feed. The whole process with Wix’s website-builder saved me the time I’d spend browsing storefront designs to find the one.

The Wix template option on the other hand, provided me with the browsing experience of my dreams. I could go over the 900+ pre-designed templates and pick the one I love. All you have to do then is add your content, pictures, logos, connect your social media, and your site is nearly done. Alternatively you can pick a template as a base and completely re-shape it to your liking.

If you like to choose between options like I do, then create your store with the Wix templates. If you’re in a hurry or just want to try out a quick site creation, go with Wix’s website-builder.

2. Add Wix Stores to your online store

Wix Stores is an element that you can add to your Wix site. It will turn a non-ecommerce site into an online store by allowing you to sell products, set up payment methods, create coupons, and more. Plus, you’ll get industry-leading marketing integrations and advanced SEO tools to boost traffic and make sure your store gets found on search engines like Google.

Wix Stores doesn’t cost a thing to add to your site, so you can easily create a free online store on Wix. However, to accept on-site purchases, you’ll need to upgrade your Wix account to one of their Business & eCommerce plans. I’ll cover Wix’s subscription plans later in the article.

If you choose to edit a Wix online store template, you’ll get a fully built store with everything you need to get started. This includes product galleries, order management, Wix Payments, and other built-in business features that you can edit, add, or remove to your liking.

If you designed your store with Wix’s website-builder, then you can add the Wix Stores add-on from inside your site’s dashboard as follows:

  1. Log into your Wix account.

  2. From your Wix Dashboard, click Edit Site at the bottom left of the side menu.

  3. In the header menu, click Add, then Apps. Find Online Stores and click Add. You’re done!

Note that if you chose Online Store when asked what kind of website you’re creating, then Wix Stores is already built-in.


wix store built-in feature

Wix Stores as a built-in feature in the Wix website-builder

After you’ve added Wix Stores to your Wix site, it’s time to add the Printful app.

3. Connect Wix Stores to Printful

The Printful app is the link between your Wix online store and the Printful account you set up. The integration will import Printful products and fulfill all incoming orders automatically. Here’s how you connect Wix Stores to Printful.

  1. Go to your Printful account and log in.

  2. In the Printful Dashboard side menu, click Stores > Choose platform.

  3. Find Wix and click Connect.

  4. Follow the on-site steps to complete the connection—and that’s it!

If you’re more of a visual learner, here’s a video tutorial.

preview play-button

Now you’ve added Wix Stores and the Printful app to your site. Well done, and it’s time for the fun stuff. That’s customizing your online store layout, branding, and color schemes.

4. Customize your Wix online store

How far can you go with tweaking your online store? With Wix, you can go all the way.

If you’re designing your storefront with Wix’s website-builder, you can modify and add sections from their pre-designed blocks. If you’re working with Wix templates, you have complete design freedom. You can add and remove any site element you want.

But with design freedom comes great responsibility. And I don’t want you to get lost in the many design features Wix offers.  Below I’ll guide you through the possibilities you get using the Wix Editor.

Choose from 900+ designer-made storefront templates

Each template has its own concept, layout, and features. To see the templates we suggest, visit our blog on Wix ecommerce templates and pick out some favorites.

alien storefront banner

Wix merchant example: HELLIER storefront design

 Quick tip! You can create as many sites as you want on Wix, but you won’t be able to change your site template. Check out all your options before you commit!

Wix has a collection of online store templates. Each template comes with a built-in Home, Shop, About, FAQs, and Contact page. Some templates also have a Shipping & Returns and Privacy Policy page. In any case—you can add and remove pages as you like. merchant example storefront with banner

Wix merchant example: Bad Bitch Book Club storefront design

Aside from online store templates, Wix also features templates built to showcase photography, music, events, travel adventures, communities, and more. You can choose whichever template you like and add Wix Stores to any of them.

Play around with advanced design features

Even though you’ll work with a template, you can still customize every single thing on the page. Seriously—everything. You can:

  • Add countless shapes, lists, and grids to define the look of your online store. Change the color of the shapes, and add links or text to them.

  • Animate your store. Add video backgrounds, scroll effects, and moving images with transparent backgrounds.

     storefront with banners

    Wix merchant example: PMPV storefront with banners and animation effects

  • Have fun with hover boxes. Surprise your customers by revealing a promo deal that appears on a hover.

  • Pin buttons to your site. With Wix’s drag and drop builder, you can place them anywhere you want.

  • Add a lightbox—a seamless pop-up that asks visitors to sign up to your mailing list or promotes a special offer. You can set a time for it to appear and even customize it so the rest of the website gets dimmed and the focus is directly on the lightbox.

You can find all of the elements I mentioned (and more!) in the Wix Editor. To add these design elements, click Add from the left side menu.

Showcase your brand with a custom domain

Store customization isn’t just design. It’s also branding. It’s making sure your customers remember your store name so they can come back and shop.

Pick a simple yet bold name for the domain. Wix offers free web hosting and a free domain to use—username.wixsite.com/yourstorename. If you want your own custom solution, like yourstorename.com, you can get the domain name with Wix too.

Speaking of customization . . . it’s time to add your custom designs to your favorite Printful products.

5. Design and add Printful products to Wix Stores

Printful offers a wide selection of products. You can choose to sell products from different customization techniques like embroidery or print.

Quick tip! Start by checking out the design file guidelines for each product you want to sell. You’ll find these on each respective product page. Follow the guidelines to achieve the best results.

After you’ve decided on the products you’ll want to sell, here’s how to push them to your Wix online store:

  1. Go to your Printful Dashboard > Stores > click Add next to your Wix online store.

  2. Choose a product and either create or upload a design. When you’re done, click Proceed to mockups.

  3. Pick the product mockups you want for your store and click Proceed to description.

  4. Add your product title and description and click Proceed to pricing.

  5. Set your pricing and hit Submit to store. Your product is now live on your store and you’re all set to start selling on Wix!

As any sensei would, I also followed the guidance I gave you. I added three t-shirts to my Wix online store. For my product designs, I used Printful’s Quick Designs to save time. This is how my newly added products look on Printful’s side: product sync process for wix

Three Printful t-shirts pushed to Wix Stores

And below is a view of my Wix online store once I added products. Neat!

  online store example on wix

Sensei Una Merch store created on Wix Stores

When it comes to showcasing products on your Wix online store, you can customize that too. Simply click on the Quick edit button which will appear in the edit mode when you click anywhere on the page. Then click on Settings.

  showcasing products on wix

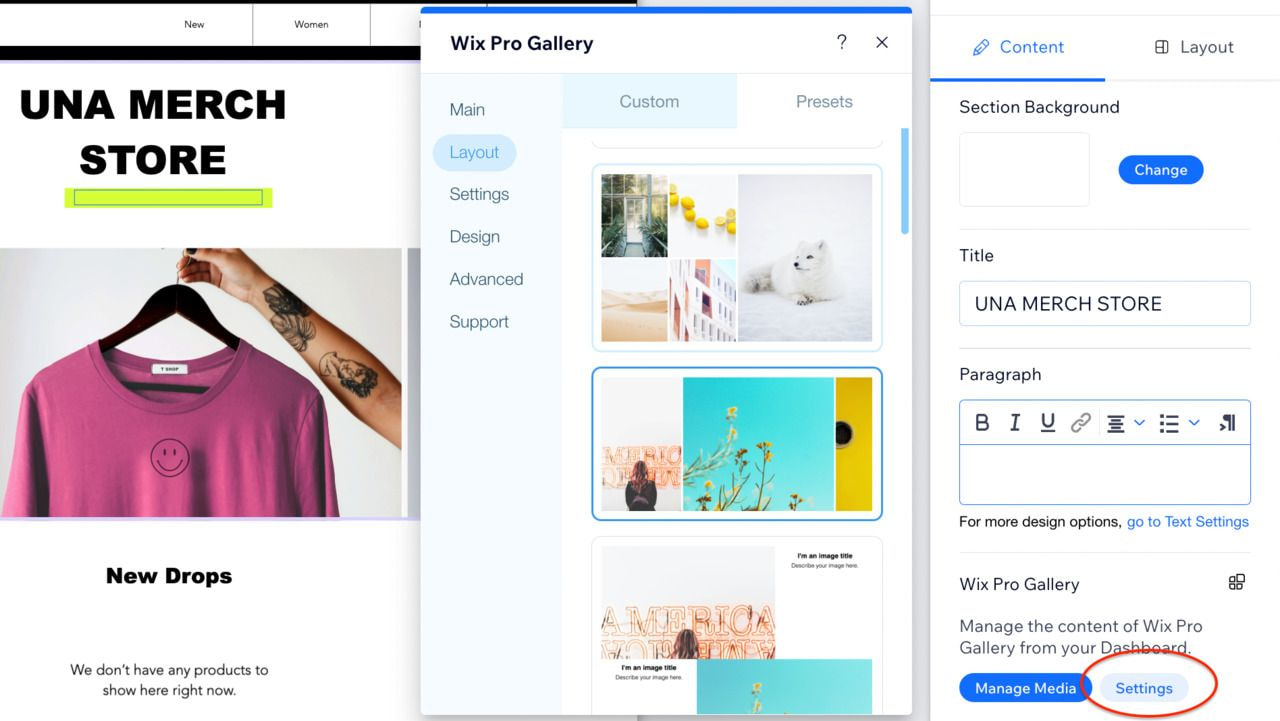
The Wix Editor view when switching to Product Pages

Here you can change up the layout, the button styles, add scroll animations, and more. 

The Wix Editor is filled with amazing features and functionalities that’ll help you create a professional store. Once you get to know them, all you need to do is click, drag, and drop. 

On the left-hand side, you’ll find more options like adding sections, page menus, and customizing the site theme.

  product design on wix

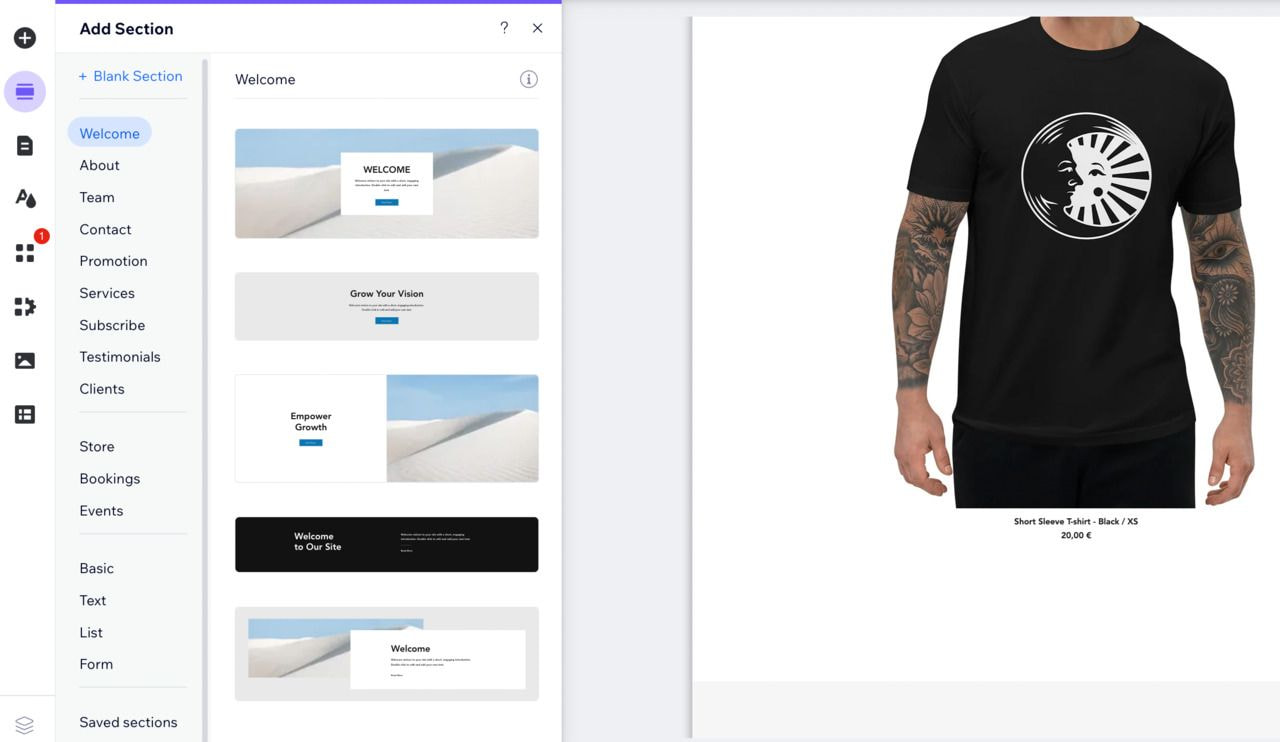
Build your website by dragging and dropping blocks

This is an intuitive way to tailor your template to reflect your vision. We also suggest adding an About section in addition to a contact page and some testimonials. You want your customers to know that they can trust you and reach out if they have any questions.

There’s so much you can do with Wix, but as you design your website, remember to:

Keep it simple

Simplicity is key when it comes to web design. A clean and easy-to-follow layout can make a big difference. Avoid cluttering your website with too much text or too many images.

Use white space

White space, or negative space, is the area between design elements on your site. It helps to give your website a balanced and professional look. Don’t be afraid to use it.

Choose a color palette

A united color palette can enhance your website’s overall appearance. Use colors that complement each other and that suit your brand. 

Use high-quality images and graphics

Images can make or break a site’s design. Use high-quality images that are relevant to your content. Avoid using blurry or pixelated images and clipart.

Use typography effectively

Typography can set the tone for your website’s design. Choose fonts that are easy to read and that make sense for your brand. Avoid using too many different fonts or ones that are hard to read.

Make it mobile-friendly

Shopping with smartphones has become the norm, so make sure your website is optimized for mobile devices. This means using a responsive design that adjusts to different screen sizes. You have the option to switch to smartphone view in the edit mode.

Keep it consistent

Consistency is key when it comes to web design. Use the same fonts, colors, and layout throughout your website. This helps create a cohesive, professional look.

Playing around with designs and color schemes was fun. But as your sensei, I must guide you through the less-fun parts of store setup too. Our next lesson is connecting a payment method for your Wix online store.

6. Connect a payment method to your Wix online store

Wix displays available payment providers according to your business’s location. Here’s how you set up a payment method on Wix Stores:

  1. Go to your Wix Dashboard.

  2. In the left-side menu, click the Settings tab, Accept Payments.

  3. Connect the Wix Payment methods or any third-party providers you want your customers to use.

payment method setup process

Wix payment providers that operate in the US

Then you’re all done! And we can move on to the next step, which is setting up shipping for your Wix online store.

7. Set up shipping on Wix Stores

When configuring your shipping settings for Wix Stores, you’ll work with these two variables: shipping regions and fulfillment services.

Go to your Wix Dashboard and in the side menu, click Settings, then Shipping & fulfillment. Domestic and international shipping regions will be preset based on your location. You’ll see that each region has specific countries assigned to them. You can change those by clicking Edit next to the toggle.

Delivery setup process on page

Here’s what Wix’s default shipping settings look like for US residents

By the way, Wix has a fantastic interactive guide. See the orange button? It’ll take you through the entire process.

You can add a new region by clicking on the blue + New Region button and then assign countries to it. Since you’ll be using Printful’s shipping rates, I suggest setting up your shipping regions similarly. That means setting up a separate region for the USA, Europe, Canada, Australia, New Zealand, and worldwide. Note that if you’re selling in Europe, unfortunately Wix doesn’t offer Europe as a shipping region, so you’ll have to add each country manually.

To figure out which shipping calculation method you’ll use for which region, click Edit next to the toggle and you’ll see the shipping calculation block.

Keep in mind you’ll have to configure the calculations block for each shipping region you have.

Wix shipping setup

Here’s what the shipping calculation block looks like on Wix

  • Free Shipping—no shipping charges

  • Flat Rate—same rate for all purchases

  • Rate by Weight—different rates for purchases of various order weights

  • Rate by Price—different rates based on order values

  • Rate by Product—specific rates for groups of products

You can also offer hand delivery or let customers pick up their orders in person, but these two options don’t work with Printful products.

The Wix and Printful integration support Flat Rate shipping only. You may end up covering the shipping cost difference, because rates on Wix’s end may not match Printful’s shipping rates.

I recommend you choose the Free Shipping setting. Why?

The Free Shipping setting is the easiest to set up. Plus, free shipping is a major selling point! To set up free shipping, select Free Shipping from the dropdown in the Shipping Calculation block and save your settings.

Even though your customers won’t be charged for shipping, you still have to make up for the cost because Printful will charge you. Figure out how to work the shipping costs into your product pricing so you don’t lose money. You can calculate the average shipping rate from all Printful shipping regions or just the regions where most of your orders ship out (the US and Australia, for example). Then include that average shipping cost in your product’s price and you’re done!

If you want to set up shipping rates for your products, go with the Rate by Weight setting. Read more about the setup from this article about matching Printful shipping rates to Wix Stores.

Next, our training journey continues with Wix Premium plans. Specifically, which plan you’ll need to sell with Wix Stores.

8. Choose a Business Premium plan to sell with Wix Stores

You can spend as much time as you need to for setting up your product line, payments, and shipping. The only thing you won’t be able to do without an ecommerce Premium Plan from Wix is accept payments. You can’t really run an online store without that, right?

To start selling on Wix with Printful, choose from the Business Basic, Business Unlimited, or Business VIP plans from the Wix Business & eCommerce plans. These are the only plans that support on-site purchases.

The base price is $27 for the Business Basic ecommerce plan. Go over what each plan has to offer and choose whichever one matches your online store’s needs.

What else do you need? Well, I’ve guided you through the store setup on Wix’s end. The last step for me is to set you free. But how can I let you go without sharing some hot marketing tips? I can’t.

9. Launch your online store and start marketing

Wix and Printful have plenty of marketing-related apps, features, and blogs to help your store flourish. Here’s what you can do:

I trust your store will turn out great, so don’t hesitate to share your experience with Wix in the comments below. And if you ever feel stuck at some point during the setup, just let our support team know or contact someone from the Wix team.

See you on the flipside!

Read next: Wix vs. Shopify: Choosing the Right Platform for Your Online Store

author

By Una Savčenko on Mar 2, 2023

Una Savčenko

Author

Una’s a passionate content team lead with a keen interest in delving into the world of marketing campaigns and the psychology behind persuasive advertising copy.

Una’s a passionate content team lead with a keen interest in delving into the world of marketing campaigns and the psychology behind persuasive advertising copy.