


Table of contents
One of the best ways to build an ecommerce business is to create a dropshipping store. It usually doesn’t require a lot of money to get started, and there are multiple ways to do it.
For example, starting a print-on-demand dropshipping store with Printful is easy and doesn’t require an upfront investment. Printful fulfills and ships your orders to your customers only after an order’s been placed. But to start using Printful, you need to create a store using an ecommerce platform or a marketplace.
WooCommerce is one such platform. Whether you want to create a new print-on-demand WooCommerce store, or want to expand your existing store, the WooCommerce + Printful integration might just be the right fit for you. Read on to find out.
Can I integrate Printful with WooCommerce?
Yes, you can integrate Printful with WooCommerce and over 15 other platforms and marketplaces.
WooCommerce is one of the most popular open-source ecommerce platforms out there. It’s really customizable, making it easier to create your dream store. Plus, you can add features and extend the functionality of your store with official WooCommerce plugins.
Follow the steps below to learn how to integrate your WooCommerce store to Printful or watch the video before getting started.


How to connect Printful to WooCommerce
To connect Printful to WooCommerce, you first need to create a WooCommerce account. Once you’ve done that, it’s time to integrate. Let’s go through the process of integrating Printful with WooCommerce step by step.
Step 1: Create your Printful account
You can create a Printful account for free. It takes only a few minutes to sign up—simply click on Sign up on the Printful homepage and register with your email or social media account.

Source: Printful

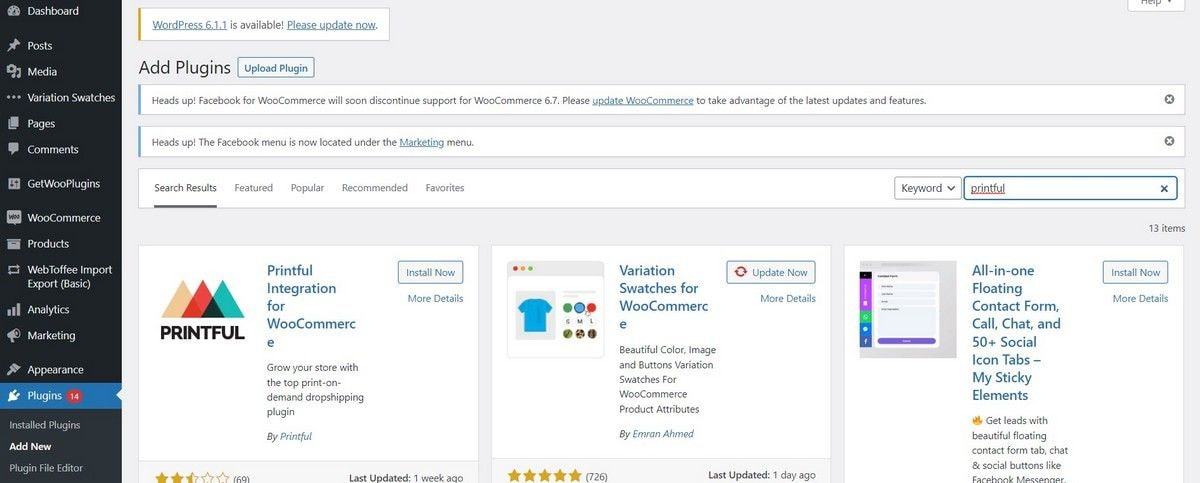
Step 2: Install the Printful WooCommerce plugin
To install the free Printful plugin, head to your WordPress Dashboard, choose Plugins from the side menu, and click Add new. Then use the search bar to find the Printful plugin. It’ll appear first, click Install now.
Source: WordPress
Once the plugin is installed, click Activate.

Source: WordPress
When the plugin is activated, you’ll be able to easily access it from the side menu.
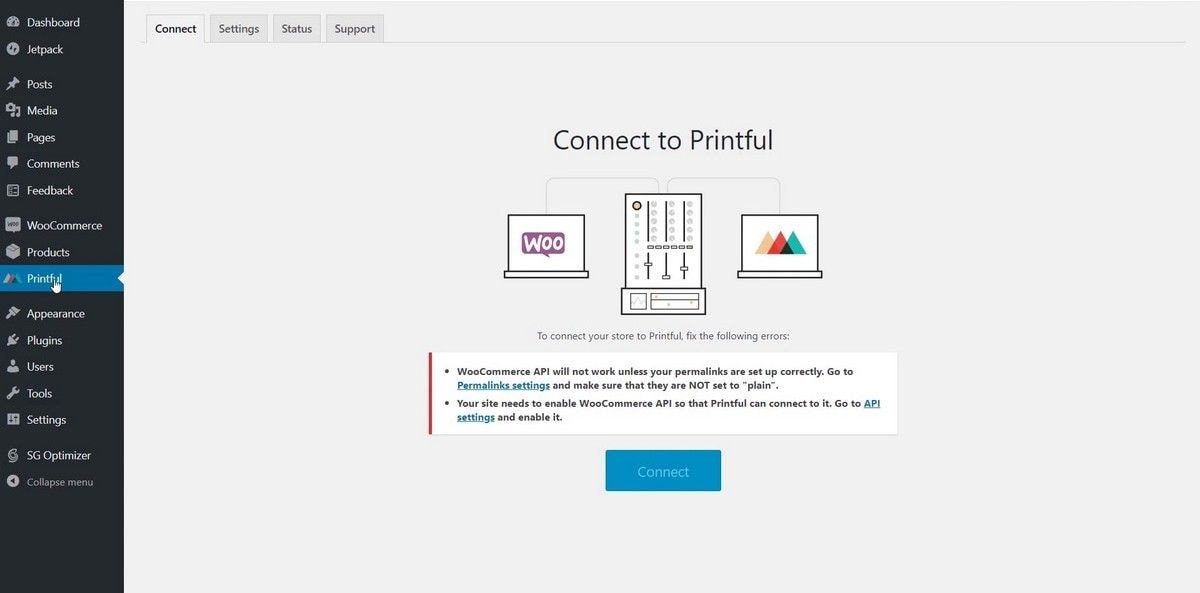
When you click on the Printful plugin, you’ll see that there are two things you’ll need to do before you can connect your WooCommerce store.
Source: WordPress
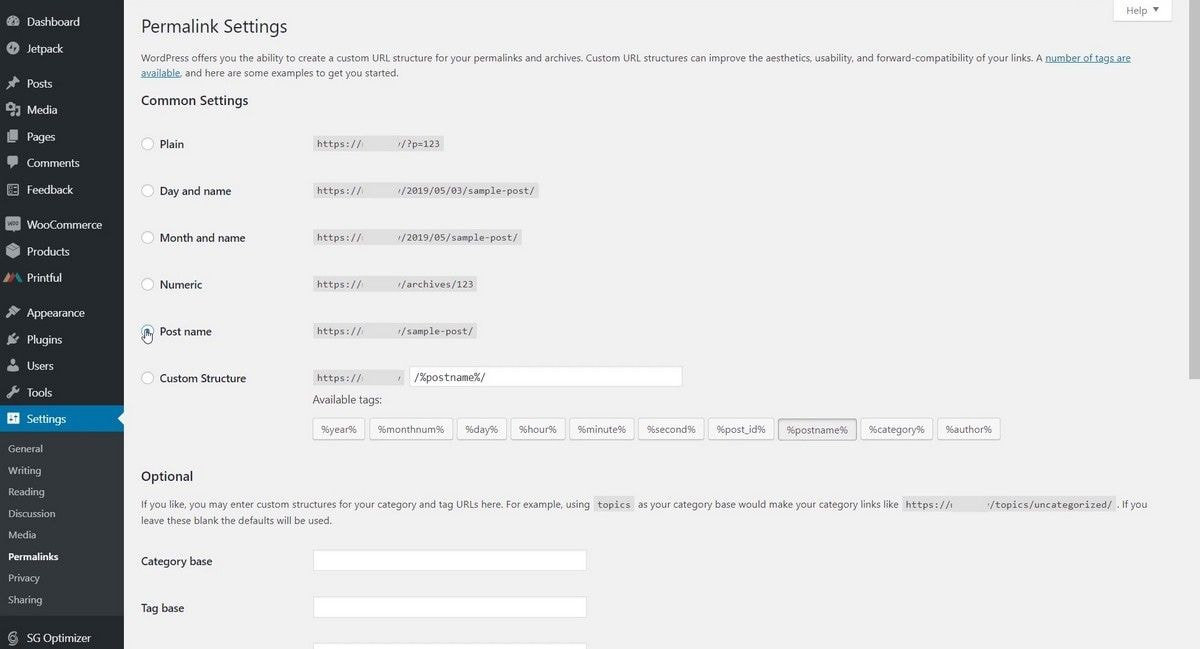
First, you need to set up your WordPress permalinks, so the WooCommerce API can work properly. Click on the Permalinks settings and, under Common Settings, choose any other link structure than Plain. Then click on Save changes at the bottom of the page.
Source: WordPress
Head back to the Printful plugin. To take care of the WooCommerce settings, click on the API settings.

Source: WordPress
Under the Advanced tab, click on Legacy API and check the Enable the legacy REST API box, then click on Save changes.

Source: WordPress
Now you can go back to the Printful plugin and sync your WooCommerce store with Printful. Click on Connect.

Source: WordPress
It’ll ask for your permission to connect Printful with WooCommerce. Click Approve.

Source: WordPress
You’ll be redirected to Printful. Sign in to your existing account or click Continue if you’re already signed in. You can also create a new free account here if you don’t have one yet.

Source: Printful
Once you’re in your account, you’ll need to confirm the connection by clicking Connect store to [your email address]. It’ll take up to a few minutes to sync.

Source: Printful
Step 3: Add products to your online store
Now you can start adding products to your WooCommerce store. To start, click Add product and choose the product category and model from Printful’s Product Catalog.

Source: Printful
Once you’ve chosen a product, click on it and create your design. Choose the fulfillment technique (like DTG printing) if more than one is available. Then choose the product colors and sizes.

Source: Printful
After, click on the tab Design. Here you’ll be able to create a design using a variety of Printful’s free resources like text, clipart, and Quick Design, or choose Premium Images for an extra fee. You can also upload your own designs.
Choose the placement of your design. You can use the same or different designs for different placements. Keep in mind that there’s an additional fee for extra placements.

Source: Printful
If you choose to upload a file, you can use your own print file or sample files made by Printful’s in-house designers.

Source: Printful
Once you’ve chosen the design, you can resize and reposition your print file. Make sure to follow along with the print quality information for the best result.
When you’ve designed your product, click Proceed to mockups to continue adding the product to your store.

Source: Printful
Here you can choose the type of mockup images you want to show on your store, and select the image format. Note that the green star in the corner of the photo indicates that it’ll be the main photo in your product catalog. You can change the main photo by clicking on it on the right side of the Mockup Preview.
Once you’ve chosen mockups, click Proceed to details.

Source: Printful
In this step, you’ll be able to set the product title, description, size guides, and other information. You’ll also be able to change this information in your WooCommerce store later.
Once you’ve set the desired information here, click Proceed to pricing.
This is the last step before you can add your product to your store. Here you can set your revenue or retail price. To change the revenue, click Set revenue. You can also change revenue by adjusting the retail price with “+” or “-” next to the sum.
Once you’re done, click Submit to store.

Source: Printful
Now you’ll see the product added to your store. On this page, you can add products and edit the product directly in your Printful Dashboard or in your WooCommerce store.

Source: Printful
Step 4: Set shipping
To set up shipping for products fulfilled by Printful, go to your WordPress Dashboard.
In the side menu, click on the WooCommerce plugin, then choose Settings. Under General options, find the Shipping location(s) and enable shipping from the dropdown variants. Scroll down and click Save changes.

Source: WordPress
Then click on the Shipping tab and under it you’ll find Printful shipping.
On this page, you need to check the Enable this shipping method box. You’ll also have the option to disable standard WooCommerce rates for products fulfilled by Printful. That means, if you have other manual shipping rates set for products not fulfilled by Printful, those will not be visible at the checkout for Printful products. Leave this blank if you want to use shipping rates other than the ones offered by Printful.
Click Save changes to enable live shipping rates.

Source: WordPress
You can also set the shipping methods you want Printful to use for shipping your orders to your customers.
In the side menu, click on the Printful plugin and then on the Settings tab. Here you can specify which shipping speeds are available for your store based on location. Uncheck the ones you want to disable.

Source: WordPress
If you want all of your orders to be tracked, disable the options that say Without tracking.
When you’re done, click Save changes. Printful’s algorithm will determine the fastest, most cost-effective, and most reliable shipping method for each order.

Source: WordPress
To learn more information about Printful shipping, click here.
Step 5: Set tax rates
Depending on where your customer lives, Printful may charge tax on your orders, like sales tax in the US or VAT in the EU. You may also be liable to collect tax from your customers. It’s a good idea to consult a tax specialist on your specific situation.
For some US states, Printful calculates sales tax automatically. To enable that, you need to go to the Settings tab in the Printful plugin and check the Calculate sales tax box. To see in which states Printful charges sales tax, click here, or on the states where Printful applies sales tax hyperlink.

Source: WordPress
For other locations and questions about WooCommerce tax settings, get in touch with their customer support team.
To learn more about taxes related to Printful products, click here.
Step 6: Set billing for your store
To ensure that your customer orders get through and Printful can fulfill them, you need to set up billing on your Printful Dashboard.
Head to your dashboard, and in the side menu under Billing, choose Billing methods. Here you can set a primary billing method, which is the default Printful will use to charge you for future transactions.

Source: Printful
To set a new billing method for your store, click Add new billing method. Select your store in the dropdown, then select the billing method you want to use.
Once you’ve done that, you can start selling your custom products right away.

Source: Printful
FAQs
Go to the WooCommerce plugin on your WordPress Dashboard in the side menu. Choose Settings, and under General options find the Shipping location(s) and enable shipping.
Then, click on the Shipping tab and under it you’ll find Printful shipping to enable live shipping rates. Check the Enable this shipping method box. You’ll also have the option to disable standard WooCommerce rates for products fulfilled by Printful. Leave this blank if you want to use shipping rates other than the ones offered by Printful.
To sync WooCommerce and Printful, you need to install the Printful plugin. Go to your WordPress Dashboard, from the side menu choose Plugins, and click Add new. Find the Printful plugin through the search bar, then click Install now. Once installed, click Activate.
Click on the Printful plugin in the side menu. You’ll need to do two more things to connect your WooCommerce store to Printful.
- In the side menu, click Settings, then click Permalinks. To get the WooCommerce API working correctly, under Common Settings choose any link structure other than Plain.
- Then go to the WooCommerce plugin settings, click on the Advanced tab, then click on the Legacy API tab. Check the box Enable the REST API.
Now you can go back to the Printful plugin and connect your WooCommerce store to Printful. Click on Connect and then click Approve.
You’ll be redirected to Printful with the option to either create a new account or connect to an existing one. After, you’ll need to confirm the connection and wait up to a few minutes while the WooCommerce store syncs to Printful.
Go to your Printful Dashboard and click on Stores in the side menu. Find your WooCommerce store and click Add product. Then choose the product you want to add to your WooCommerce store, select colors, and sizes, and design the product with Printful’s free Design Maker.
Click Proceed to mockups and choose product mockups for your store. Click Proceed to details to set the product title and description. Click Proceed to pricing to set the retail price or revenue.
Then click Submit to store and wait a couple of minutes while the product syncs to your online store.
In the US, most states require ecommerce businesses to collect sales tax. Because the sales tax rules vary by state, it’s best to contact your state’s department of revenue or other local agencies responsible for sales tax to find out whether your business will need a seller’s permit.
If you’re based outside of the US, you’ll need to check your country’s local laws to know if you need a seller’s permit.
WooCommerce is better than Shopify if you’re an experienced online business owner who wants an open-source, customizable ecommerce platform. If you’re a beginner or a small business owner, Shopify could be a better choice as it’s quite easy and fast to set up with pre-made templates that you can customize.
Start promoting and selling
That’s it! You’ve successfully integrated your WooCommerce online store to Printful, created and added products, plus set up shipping, billing, and taxes. Now you can promote and sell products to your customers, while Printful takes care of fulfilling and shipping your orders.
Good luck building your brand!
Read more: Shopify vs. WooCommerce—Which Is Best for Your Online Store?

Jana is a Senior Content Writer at Printful with a background in creative writing and content marketing. She draws inspiration from all things creative and has a deep love for all things written, be it a book, a script, a quote, or a joke.