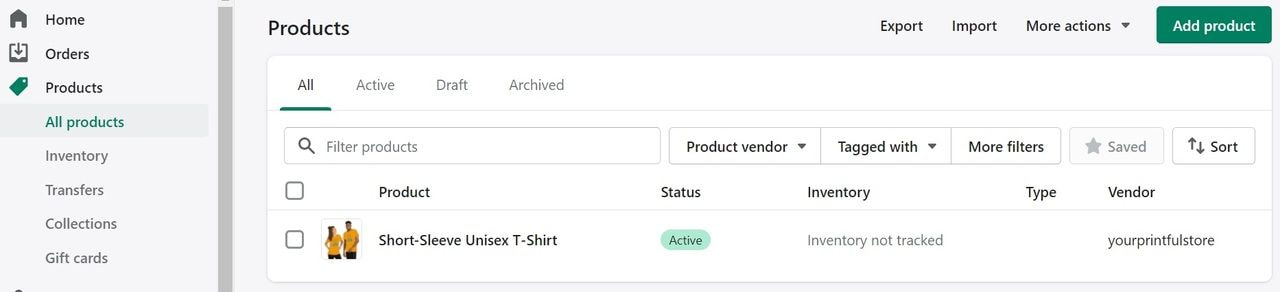
Get Started
Printful Blog logo
Creative services
Photography services

Blog / Beginner's handbook / How to Start an Online Store with Printful

Beginner's handbook

Printful Blog

Master the art of ecommerce

Launch your own print-on-demand business

Sign up with Printful

No upfront fees • No order minimums • 328 premium products

Printful Blog

Blog / Beginner's handbook / How to Start an Online Store with Printful

Beginner's handbook

How to Start an Online Store with Printful

How to Start an Online Store with Printful
Juliana Gabilondo

By Juliana Gabilondo

12 min read

Starting an online store is a lot like trying to cook something from scratch: it can be overwhelming if you don’t have a list of ingredients and a clear recipe. 

So hi, I’m Juliana, and I’ll be your ecommerce chef today! To help you get started, we’ll go over my step-by-step recipe to create a print-on-demand online store with Printful. 

By the end of this blog post, you’ll have your ecommerce store baked and ready and be well on your way to making your first sale.

Here’s a video that will help get you started:

preview play-button

Step 1: Create your Printful Account

The first step in this recipe is creating your Printful account.

Printful s signup page

Source: Printful's signup page

Sign up with your Facebook, Google, Apple, or email account. It’s completely free and easy to do.

preview play-button

Choose which platform to sell on and connect it to Printful. Log in to your Printful account, go to the side menu in your Dashboard, and click Stores > Choose platform to see your options.

Platforms and marketplaces on Printful s dashboard

Source: Printful Dashboard

You can connect Printful to 20+ ecommerce platforms and marketplaces, so you have a wide range of options to find a storefront that best suits your needs. 

Ecommerce platforms Online marketplaces
Your store is built as a standalone website Your store is an account on the marketplace’s website
Traffic to your site comes from your marketing activities and search engines Each marketplace comes with its own search engine that offers an additional source of traffic
Greater freedom to personalize your store as you see fit Limited options for personalization determined by the marketplace
Payment processing is set up separately (most platforms offer apps or add-ons for this) Most marketplaces offer built-in payment processing
Ideal for sellers looking to grow their own brand Ideal for sellers who want to start out on an already known marketplace


Take a look at the chart I’ve created with information about every platform and how to connect them with Printful, arranged by price, from lowest to highest.

PLATFORM TYPE BEST FOR SETUP TIME PRICE
Shopify Ecommerce platform Small businesses Very fast $
Etsy Marketplace Artists, beginners Very fast $
Woocommerce Ecommerce platform Developers, large retailers Moderate $
Prestashop Ecommerce platform Developers, large retailers Moderate $
Square Ecommerce platform Artists, beginners Moderate $
Big Cartel Ecommerce platform Artists, beginners Fast $
Weebly Ecommerce platform Artists, beginners Moderate $
Magento Ecommerce platform Developers, large retailers Slow $
Gumroad Ecommerce platform Artists, beginners Fast $
Shipstation Ecommerce platform Developers, large retailers Moderate $
Launch Cart 3rd Party integration Brands, influencers Fast $
Wix Ecommerce platform Small businesses Fast $$
Squarespace Ecommerce platform Artists, beginners Moderate $$
Webflow Ecommerce platform Artists, beginners Moderate $$
Ecwid Ecommerce platform Small businesses Fast $$
BigCommerce Ecommerce platform Small businesses Fast $$
Storenvy Marketplace Artists, beginners Fast $$
Nuvemshop / Tiendanube Ecommerce platform Artists, beginners Moderate $$
eBay Marketplace Small businesses Slow $$
Shift4Shop 3rd Party integration Small businesses Moderate $$
Amazon Marketplace Small businesses Slow $$$
Source: Printful Integrations

If you’re a developer, you can choose Printful API to create custom solutions for your business. It’s simple to use and integrate into apps and services created with any modern programming language. 

For the sake of example, I’ll be using Shopify. To connect Printful to Shopify, install Shopify’s app to integrate with Printful. Click Add app, enter your store’s URL, then log in to your Printful account. Your accounts will be linked automatically.

We’ve also cooked up a demo store using our Shopify integration so you can get inspired and steal a couple of good ideas.

Printful logo
Customer with received custom jacket
Printful logo
Get started with Printful!
Get started

Step 3: Pick your products

Now that you’ve created your Printful account and connected it with your ecommerce platform or marketplace, it’s time to choose your main ingredients: the products you want to sell. 

You can pick from Printful’s wide selection of products and make designs for different customization techniques like embroidery, all-over print, direct-to-garment (DTG), or direct-to-film (DTF) print. For some products, you can combine DTG print with embroidery.

Learn more: DTG vs. DTF Printing: Which Method Is Better for Your Designs?

product catalog view

Source: Printful’s custom product collection

If you’re unsure which product to sell, you can read our blog post on how to choose products for your print-on-demand store.

Learn more: 

Step 4: Create or upload a design

Once you’ve picked a product, you’ll be redirected to Printful’s Design Maker, our free and easy-to-use design tool, to upload your own visuals or create new ones from scratch.

Upload your existing design on the Design Maker

The first step here is to cook up your product design with the software of your choice. If you need help choosing one, read our blog post about the best 16 free Photoshop alternatives.

Once your design is ready, download it as a JPEG or PNG file. Then, go back to your product on the Design Maker, select Uploads in the left menu, and you can upload your file.

For your design to come out the way you imagined, follow the design guidelines for each product on their product page. 

You can also read up on how to prepare the perfect print file and how to create the ideal embroidery file to understand how to get colors, sharpness, and other details just right.

Create your own design 

The Design Maker has built-in tools to easily create your visuals. You’ll get access to fonts, clipart collections, ready-made designs, and background patterns.

Printful's Design Maker

Source: Printful

You can use the Text Tool to find your favorite font and compose eye-catching messages, or choose from the pre-made Quick Designs and edit the colors, graphics, and texts to create your visual. 

There are also over 300 customizable clipart collections you can use for free and 80M+ Premium Getty Images at $1 per order placement. Basically, everything you need!

Create product templates

If you have a design + product idea you don’t want to lose, save it as a product template. A product template is a combination of your design and a Printful product. You can go back and edit your templates at any time or add them to your store once they’re ready to be sold. 

To access your templates, go to Dashboard > Product templates.

And if you have various stores or many templates, you can organize them into collections.

 Temaplates section on the dashboard

Source: Printful Dashboard

Step 5: Add products to your store

Just like you can choose to bake, fry, or sauté potatoes, there are different ways to add products to your store: 

  • From your Printful Dashboard > Product Templates > Add to store

  • From your Printful Dashboard > Stores > Add product

  • On any open product page, click Add to store

These three options will automatically redirect you to our step-by-step system to add items from your Printful account to your store. 

1 – Select your product variants

You’ll first need to select your product colors and sizes (these depend on your selling region and preferences). When you’re done, click Continue.

Product variant selection

Source: Printful

2 – Choose your mockups

The next thing you need to do is choose which mockups you want to use for your store.

Mockups show you what your designs will look like on the final product and make for awesome photos for your website—it’s like styling your plate to make the food look more appetizing. 

You can choose between standardized templates (basic mockups) and customizable templates you can build yourself (custom mockups).

Choosing mockup style tab

Source: Printful

If you pick basic mockups, you can pick flat lay mockups in preselected settings and visuals with different models. When you’re done, click Continue.

Basic mockup view

Source: Printful

You can customize any mockup by changing backgrounds, layouts, and props when choosing custom mockups.

Custom mockup view

Source: Printful

Once you’ve selected the mockup you want to personalize, press Select and continue. 

2nd view for custom mockups

Source: Printful 

You’ll be taken to the window where you can change the background and design elements like text, clipart, and props.

3rd view of the cutom mockups

Source: Printful

 When you’re done, press Continue. Here’s a handy video if you’d like to get extra guidance and tips for this process:

preview play-button

3 – Add product details

A title and a thorough description will let your customers know all the information they need on your product. Printful has ready-to-use descriptions, but we highly recommend customizing them and making them sound more true to your brand.

Not only are these product details a great way to show your brand’s personality, but a well-written product description can also boost your SEO, making it easier for potential customers to find your products when actively searching online.

When you’re done, click Continue.

Product details view

 Source: Printful

4 – Set your pricing and submit your product

When setting your prices, there are two things to think about. The Printful price is what we charge you for product fulfillment, and the retail price is what you sell the product for. 

If the All-Over Print Backpack costs $33 and your retail price is set at $45, the profit you make is $12. Make sure you look at our blog post on how to market premium products so they look like a steal for some fresh tips on promoting your offering.

In this step, you’ll see 3 different figures:

  • Printful’s price, which is what we charge for the products (it doesn’t include taxes, shipping, and other additional charges)

  • Retail price, which you can manually edit to increase/decrease your profit margins

  • Profit, which is what you’ll make out of every sale

Price your products right

Use our guide to review Printful costs and learn how to price your products to make a profit.

Once you’ve set your prices, click on Submit to store next to add the product to your ecommerce store.

Pricing window

Source: Printful

You can also select the option to offer free shipping on your products. Studies show that 68.2% of global shoppers were more likely to buy a product online when offered free delivery. If you turn this option on, the shipping costs will be automatically included in your retail price.

Once you’ve set your prices, click Submit to store to add the product to your storefront.

When you successfully add a product to your store, you’ll see it on your Printful Dashboard > Stores > View store, just like in the example below.


Products in the Printful Dashboard

Source: Printful Dahsboard

And now, head to your ecommerce platform to check out what your product looks like there. You can see here what my product looks like on my Shopify store:

How a product looks on Shopifys platform

Source: Shopify


Set up your store’s taxes in three steps 

Use our step-by-step guide to understand your tax obligations, learn how to find professional tax advice, and set up taxes on your storefront.

Step 6: Set up shipping

We are in the final steps of our ecommerce recipe. Next, let me show you how to think about your shipping pricing strategy. You need to keep two things in mind:

  • The shipping price you display on your store and charge your customers for

  • The shipping rate that Printful charges you to deliver products to your customers

Set up shipping on your store

It’s time to decide how you’ll charge your customers for shipping on your store—this will be your shipping pricing strategy. There are 3 different approaches you can take:

  1. Let customers know and pay the total price for shipping (the same as Printful charges you)

  2. Increase product prices to cover a percentage of shipping costs

  3. Set up free shipping by incorporating shipping costs in product prices

Setting up shipping rates can be different for each platform. Look at your ecommerce platform’s FAQs to find out how to add shipping rates to your store.

Learn more: A Complete Guide to Ecommerce Shipping Pricing

Printful’s shipping prices

Printful supports two different types of shipping rates:

  • Flat rates are fixed prices we’ll charge for shipping that you should charge on your store. Our shipping rates vary based on product dimensions and weight, fulfillment location, and shipping destination for each order. Check our shipping rates page for your products to choose a pricing strategy that suits your needs.

  • Live rates are calculated in real-time during checkout, meaning your customer is automatically given the best shipping rate available when an order’s placed. It’s available for Printful customers using Shopify, Woocommerce, Launch Cart, or the Printful API.

Head to Dashboard > Settings > Store > Shipping to enable Live rates.

Shipping settings in Printful

Source: Printful Dashboard

Step 7: Set up a payment method

Your ecommerce store is almost ready to come out of the oven! Now you have to set up a payment method on your online platform so your customers can pay you, and a payment method in your Printful account so you can pay us for fulfilling your orders.

preview play-button

Follow your ecommerce platform’s instructions to set up a billing method to charge your customers for orders. You can use many different payment processors, such as Paypal, Stripe, and Braintree. 

Learn more: Your guide to Printful payments and pricing

To set up a billing method with Printful, go to your Printful Dashboard > Billing > Billing methods. 

Billing view on the Dashboard

Source: Printful Billing methods

  • All transactions go through your Printful Wallet that’s automatically created once you sign up with Printful. Each time an order goes through, your credit card, Paypal, or Sofort account will be billed, and money will be deposited in your Printful Wallet. Then we withdraw the cost of fulfillment from there. It’s an automatic process, but you’ll be able to see all the transactions if you look at your payment history.

    Add funds to your Printful Wallet

    Manually adding funds to your Printful Wallet is a safe and easy way to secure your payments and decrease failed transaction rates. When a new order comes in, the cost for fulfillment will be withdrawn directly from your Wallet without the need to bill your payment method first.

    There are a lot of benefits to adding funds to your Printful Wallet:

    • Avoiding the risk of failed orders due to insufficient funds

    • Saving up on transaction fees

    • Having fewer pending payments on your credit card (since too many small payments can be seen as fraudulent activity by some credit card providers)

    You can add money to your Wallet with a credit card, Paypal, Klarna, or other local payment options. To add money, go to Billing > Printful Wallet, click Add money, and choose your deposit amount.

    Step 8: Market your products and start selling

    Congratulations! You made it to the end of our ecommerce store recipe. We’ve gone over all the necessary ingredients, from setting up your accounts to getting paid for orders.

    Use our Promo Maker to create original and captivating visuals for ads or social media branding. You can use 100+ templates in 6 different sizes for different platforms, create animated marketing materials, and do it all without leaving your dashboard.

preview play-button

Now it’s time to market your products to attract customers and start selling, so let me finish this blog post with some key marketing tips:

preview play-button

Go ahead and get started! Don’t get discouraged, and remember that it sometimes takes months to perfect a recipe. If you get stuck on any of the steps, leave a comment below or let us know at [email protected] so we can help you.

Printful logo
Customer with received custom jacket
Printful logo
Get started with Printful!
Get started

Frequently asked questions

author

By Juliana Gabilondo on Aug 10, 2023

Juliana Gabilondo

Juliana is a Content Marketing Specialist at Printful with a background in corporate communications. She’s passionate about brand strategy and digital marketing.

Juliana is a Content Marketing Specialist at Printful with a background in corporate communications. She’s passionate about brand strategy and digital marketing.